In this tutorial, we will cover the some basics of the Sparkfun Photon Redboard and explore the Particle platform’s publish / subscribe messaging pattern. This architecture allows a Photon to communicate information about itself (publish) as well as receive information about the status of other IoT devices (subscribe). All communication takes place though a “broker,” the Particle cloud console.
Project 1 - Internet Button
The goal of this project is to create an internet-connected button that, when pressed, sends an email.
Key Concepts
-
void setup() : all Arduino code must have a setup function defined. This gets run once when the system boots up.
-
void loop() : all Arduino code must also have a loop function defined. After setup is run, this function runs in an infinite loop.
-
pinMode() : tells the device that we’ll be using a pin to either gather
INPUTor provideOUTPUT. -
digitalRead() : takes a digital (binary) reading from the specified pin. This will return
HIGHorLOWdepending on the state of the pin. -
Particle.publish() : This function publishes an event to the Particle console. This is what we’ll use with IFTTT to make the magic happen.
-
delay() : This function pauses the program for the specified number of milliseconds, useful here so the button press is only registered once instead of many times. The latter phenomenon is known as “switch bouncing” and can cause all sorts of irregular behavior in a circuit. A delay is one way of addressing the problem but it can also be solved with hardware (e.g. a capacitor) or using software (e.g. edge detection).
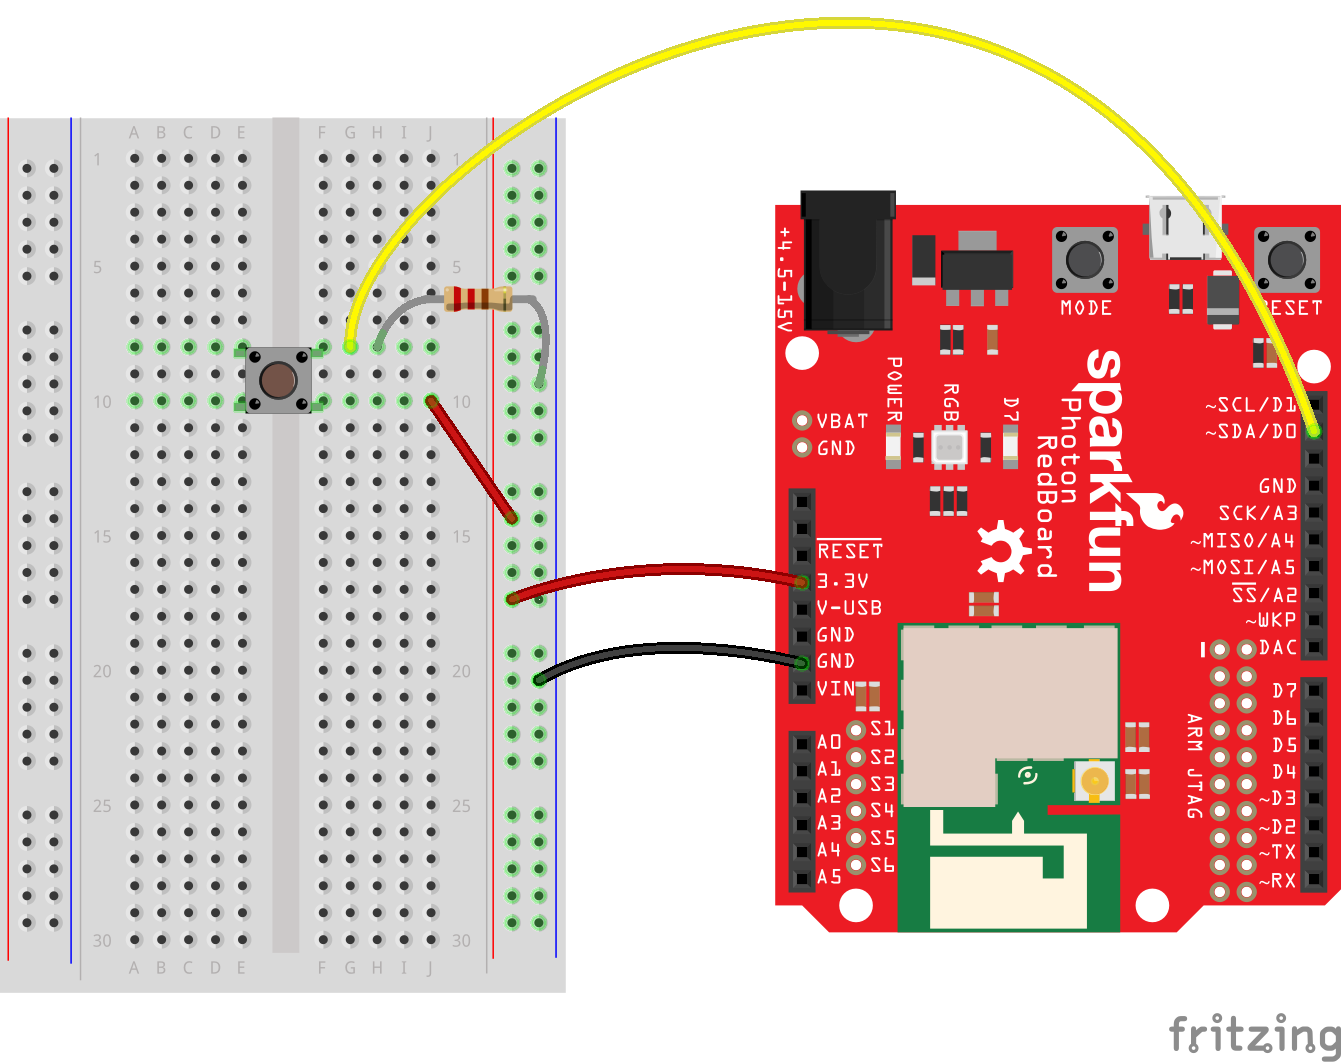
Hardware Configuration
IMPORTANT: Make sure that your Photon Redboard is unplugged before wiring up the circuit below:
Particle IDE
The online Particle IDE allows you to write code and than “flash” that code to your Photon Redboard over wifi.
-
Give your app a name in the “Title” field and press RETURN to save the file.
-
Note that the IDE pre-populates your code with the essential functions of any Arduino-based sketch:
void setup()andvoid loop(). - Let’s begin by declaring a variable to hold the pin number that our pushbutton is attached to. If your wiring scheme matches the image above, that’s digital pin 0 (D0). Add the following to your code, above
void setup(){:const int buttonPin = D0; - Next, let’s use the
pinMode()function to set buttonPin to function as an input (e.g. we want to read the state of D0). This should be placed inside thevoid setup()function, so that it reads:void setup() { pinMode(buttonPin, INPUT); } - On the first line of the
void loop()function, type:int buttonState = digitalRead(buttonPin);
This will read the state of pin D0 at the start of every iteration of the void loop() function and store that state in a variable called buttonState. The value of buttonState will be HIGH (or 1) when the button is pressed, and LOW (or 0) when it is released.
- Beneath that line, and still within the
void loop()function, type the following:if (buttonState == HIGH) { Particle.publish("buttonPressed"); delay(2000); }This
ifstatement will, if the button is pressed, use the special Photon-specificParticle.publish()function to send a message Event to the Particle Console. And then the program will delay for 2 seconds to avoid switch bouncing. -
Click on the Folder icon to save the additions to your code.
-
Click on the Verify ✔ icon to check your code for errors. Address any errors that the IDE may identify.
- Finally, click on the Flash ⚡ icon to “flash” your code to your Photon Redboard.
Test Your Button
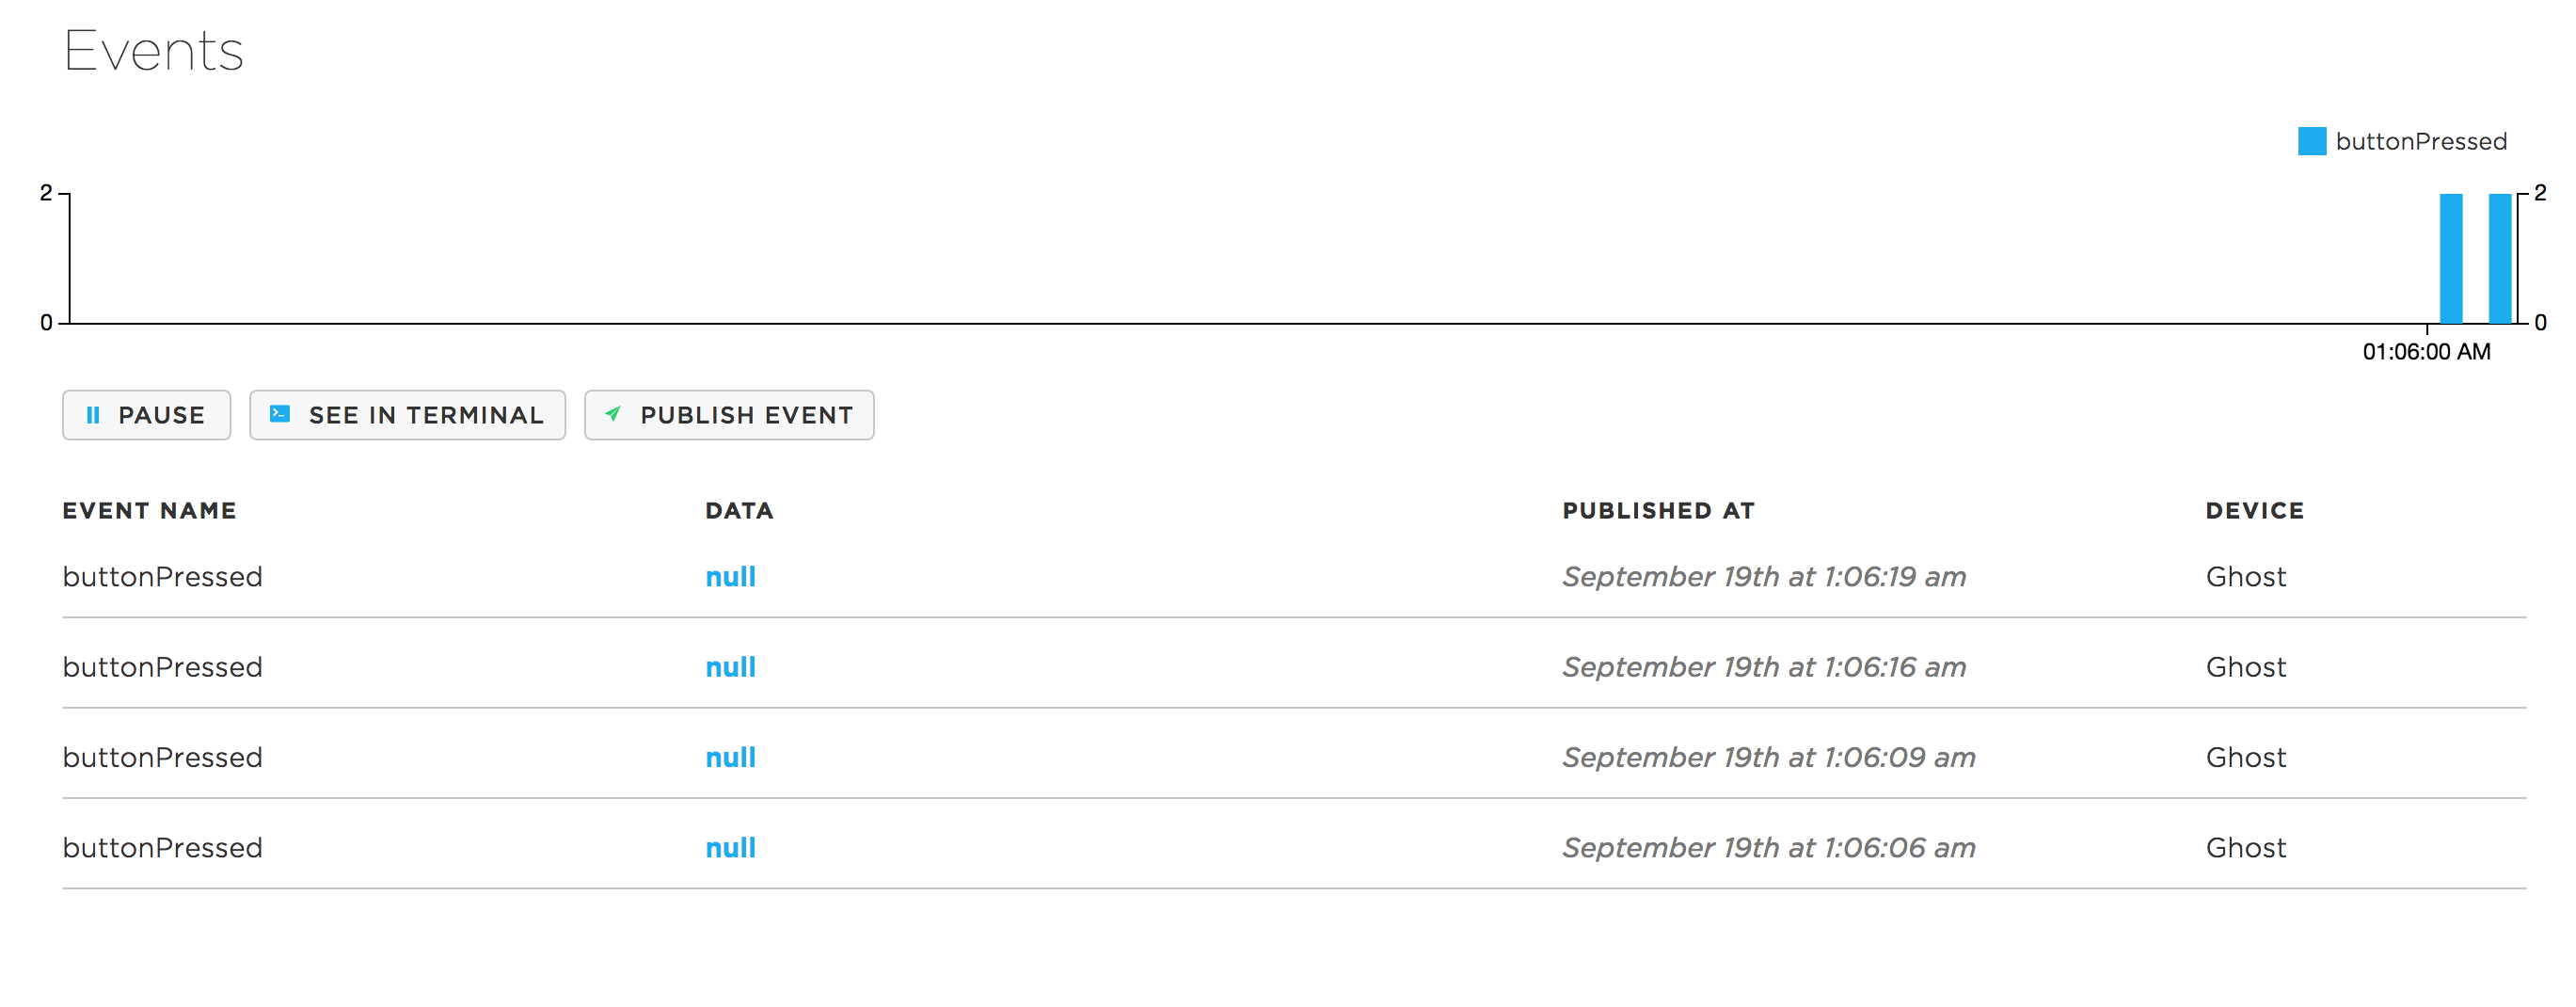
If the wiring and the code correspond and follow the correct syntax, pressing the pushbutton should publish an Event buttonPressed to the Particle Console.
-
Watch for incoming Events to your Console.
Use IFTTT to Trigger an Email Upon Particle.publish()
IFTTT (If This Then That) is a powerful platform for connecting up services between different applications. In this section we’ll create an “Applet” that connects up the Particle Console to email.
-
Visit https://ifttt.com/create
[Note: If you haven’t already created an account on IFTTT, you need to begin here: https://ifttt.com/join] -
Click on the
+thislink. -
In the search bar, search for “Particle”
-
Click on the Particle service to select it.
-
Click on the “Connect” button and enter your Particle username and password.
-
You will be prompted to grant access to Particle from IFTTT: “IFTTT has requested access to control, reprogram, and read data from your devices.” Click the “OK” button.
-
Next, you will be asked to choose a Trigger. Particle offers several; choose “New Event Published”
- In the “If (Event Name)” field, type
buttonPressed - Leave the “is (Event Contents)” field blank since the message published by our Photon Redboard does not contain any data.
- If available, make sure that the “Device Name or ID” dropdown matches the name of your Photon Redboard.
- Click the “Create Trigger” button to save these settings.
- In the “If (Event Name)” field, type
-
Click on the “+that” link to choose an action service.
-
“Email” should appear near the top of the grid of options, but you can do a search for “Email” as well. Click on it.
-
There is only one action associated with email: “Send me an email”. Click on it.
-
You can use the defaults for constructing a message or modify the output.
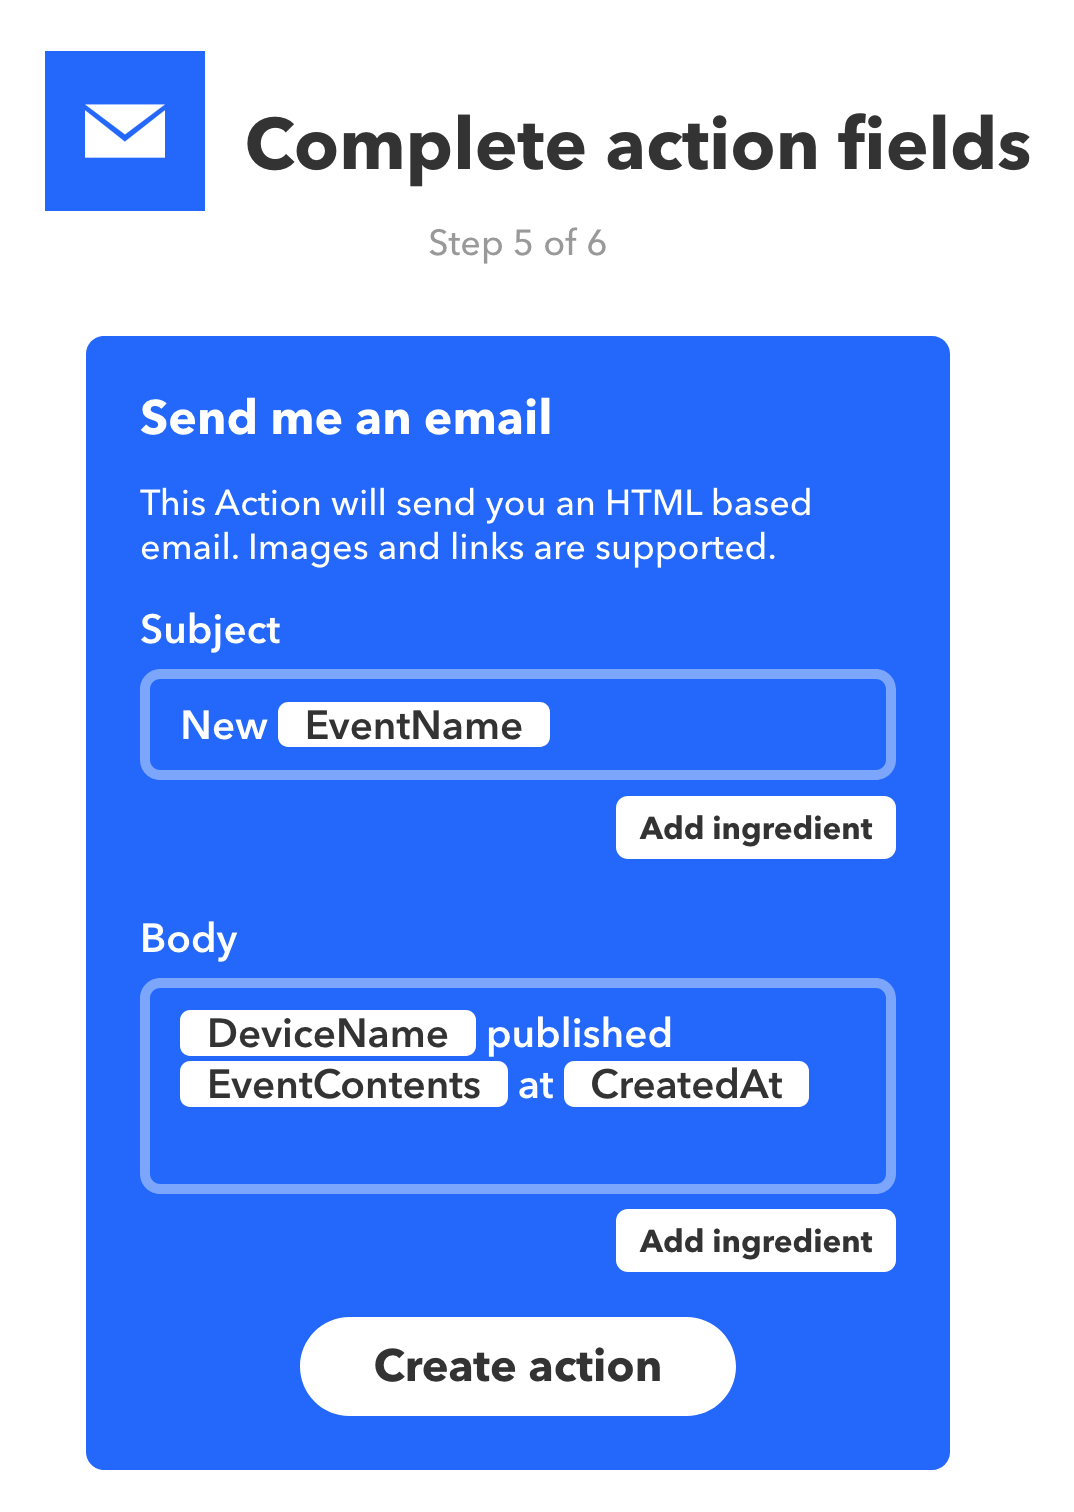
Click the “Create Action” button. -
Review your Applet and click “Finish” to enable it.
-
Press the push button switch attached to Pin D0 of your Photon Redboard.
-
You should receive an email each time the button is pressed!! Spam spam spam!!
More information on Particle’s integration with IFTTT can be found at https://docs.particle.io/guide/tools-and-features/ifttt/
Project 2 - Internet Controlled LED
In this project, we’ll define a Particle function which can be triggered from the internet (using an HTTP request, or IFTTT). This function will control the color of the Photon Redboard’s on-board RGB LED.
Key Concepts
-
Particle.function(“name”, function) : Lets you define a function that can be triggered from the internet. You pass in a “name” (used to trigger the function from the web) and a function (defines what function is called when this is triggered).
-
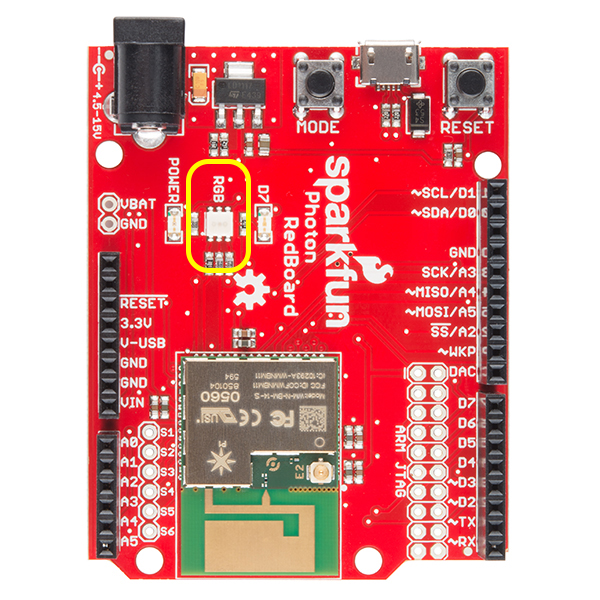
RGB.control(true or false) : Setting this function to
trueenables access to the Photon Redboard’s on-board RGB LED. It is typically called in thevoid setup()function. -
RGB.color(red, green, blue) : This function allows you to set the red, green, and blue channels of the on-board RGB. Values for each channel can range from 0 to 255.
-
void showTheRainbow() : This is an example of a function which can be called from within other functions (like in the
void loop()function). Organizing code into well named functions is helpful for organizing and understanding what the code does. -
for(int i = 0; i < 255; i += 10) {…}* : Standard for loop. Defines a variable i which starts at 0, runs the code inside the {} brackets, then increases i by 10 and runs the code again until it is greater than 255.
Hardware Configuration
Since this circuit uses the Photon Redboard’s on-board RGB LED, there is no additional hardware configuration required.
Particle IDE
-
Create a new App by clicking on “Create New App” button in the Code panel of the Particle online IDE, or direct your web browser to https://build.particle.io/build/new
-
The code for this project is much more substantial:
String lightMode; // variable to hold lightMode color

void setup() {
  RGB.control(true); // enables access to on-board RGB LED
  RGB.color(0, 0, 0); // resets the light to offers

  Particle.function("setLight", setLight); // creates ("registers") a function and makes it available for external access
}

int setLight(String command) { // variable to hold setLight commands
  lightMode = command;
  return 1;
}

void loop() {
  if (lightMode == "red") {
    RGB.color(255, 0, 0);
  } else if (lightMode == "green") {
    RGB.color(0, 255, 0);
  } else if (lightMode == "blue") {
    RGB.color(0, 0, 255);
  } else if (lightMode == "rainbow") {
    showTheRainbow();
  } else {
    RGB.color(0, 175, 255); // white
  }
}

void showTheRainbow() {
  // number of milliseconds to delay between pixel change
  // lower this number to speed up the rainbow
  int rainbowDelay = 10;

  // start with Red on, and make Green grow brighter
  for (int i = 0; i < 255; i += 10) {
    RGB.color(255, i, 0);
    delay(rainbowDelay);
  }
  // Green is now on, make Red shrink
  for (int i = 0; i < 255; i += 10) {
    RGB.color(255 - i, 255, 0);
    delay(rainbowDelay);
  }
  // Green is now on, make Blue grow
  for (int i = 0; i < 255; i += 10) {
    RGB.color(0, 255, i);
    delay(rainbowDelay);
  }
  // Blue is now on, make Green shrink
  for (int i = 0; i < 255; i += 10) {
    RGB.color(0, 255 - i, 255);
    delay(rainbowDelay);
  }
  // Blue is now on, make Red grow
  for (int i = 0; i < 255; i += 10) {
    RGB.color(i, 0, 255);
    delay(rainbowDelay);
  }
  // Red is now on, make Blue shrink
  for (int i = 0; i < 255; i += 10) {
    RGB.color(255, 0, 255 - i);
    delay(rainbowDelay);
  }
}
-
Copy and paste it into your new App and click the Folder icon to save the file.
-
Click on the Verify ✔ icon to check your code for errors. Address any errors that the IDE may identify.
-
Click on the Flash ⚡ icon to “flash” your code to your Photon Redboard.
-
Test your code by executing the following Particle CLI command in Terminal:
particle call <deviceID or deviceName> setLight "<color>"Your options for
"<color>"are"red","green","blue", and"rainbow". Any other color name will result in white.
A successful function call will return1(true) to your console.
Use IFTTT to use Email to Change the LED’s color
You can also create a webpage to control your Photon using the Particle API JS. However, given that we’re already a bit familiar with IFTTT from Project 1 above, let’s use it to control our device via email.
-
Click on the “New Applet” button in the upper-right of the page.
-
Click on the
+thislink. -
In the “Search Services” search bar, type “Email” and then click on the Email service icon.
-
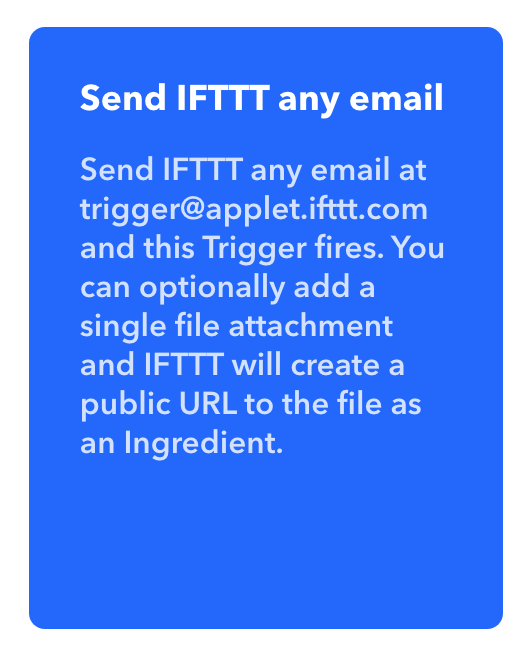
Choose the “Send IFTTT any email” trigger:
-
Click on the
+thatlink. -
Search for the Particle service and click to access its available actions.
-
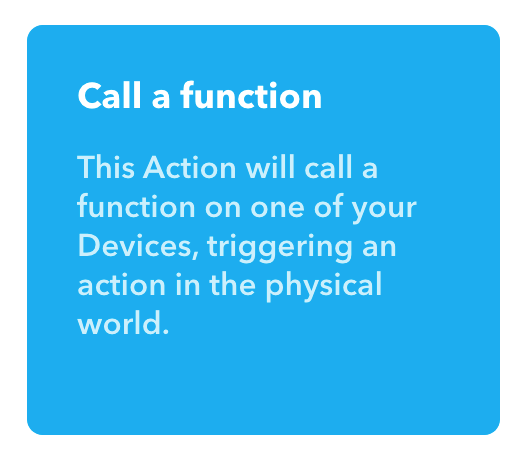
Choose “Call a function”
- In the Action Settings for this action, you can choose from any available functions that are being broadcast from your Photon Redboard. Note that the Redboard must be powered on and connected to the Particle cloud / Internet in order to be visible here. You should see
setLight on <DeviceName>already pre-populated in theThen call (Function Name)drop-down.
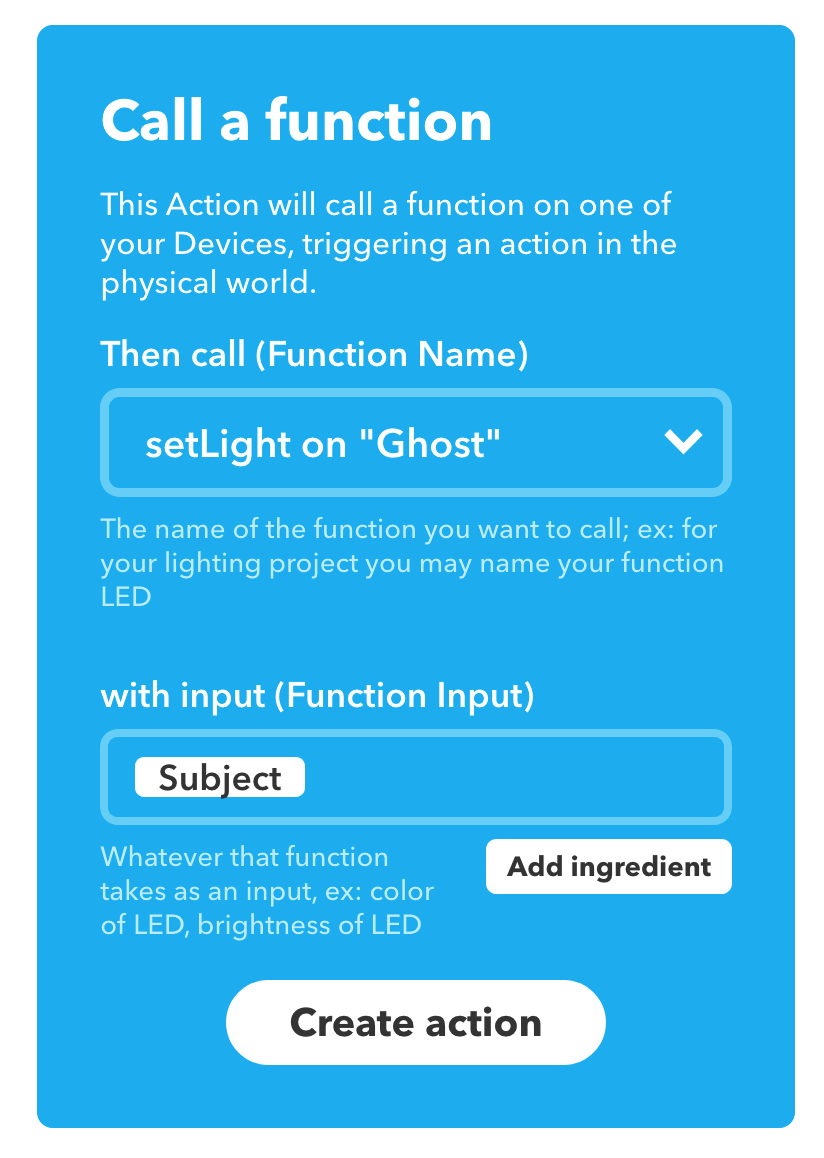
- Click in the
with input (Function Input)field and delete ``. - Click on the
Add ingredientbutton and chooseSubject. This will allow you to send a color name “red”, “green”, “blue”, or “rainbow” as the Subject of your email and the Photon Redboard’s RGB LED will change accordingly. - Click the “Create Action” button.
- Click in the
-
Click on the “Finish” button to complete the creation of this Applet and enable it.
- Test your Applet by sending an email to
trigger@applet.ifttt.comwithredin the Subject line. Make sure you’re sending the email from the account you used to set up your IFTTT account. The on-board RGB LED should change to red.
[Note: You will have noticed in step 9 that you could also send your color in the or of your email. This does not seem to work. IFTTT support has been contacted.]
Project 3 - Communicating Devices
In this project, we’ll use both ends of the Particle event system - publishing and subscribing - in order to build devices which talk to each other.
This project requires using multiple devices, so you’ll need to work in groups of 2 - 4 people. Identify your group and choose a unique name for your team!
Key Concepts
-
Particle.subscribe(“EventName”, function) : This function allows you to subscribe to all Particle Events published to the Event Name indicated. When a message is received at that Event Name, the specified function is called. You must pass in the
"EventName"of the event, and afunctionto run when the event is published.For more information, visit https://docs.particle.io/reference/firmware/photon/#particle-subscribe- -
#define : A useful C component that allows the programmer to give a name to a constant value before the program is compiled. Defined constants in Arduino don’t take up any program memory space on the chip. The compiler will replace references to these constants with the defined value at compile time. For more information, visit https://www.arduino.cc/en/Reference/Define
Hardware Configuration
This is the same hardware configuration as Project 1 above:
Particle IDE
-
Create a new App by clicking on “Create New App” button in the Code panel of the Particle online IDE, or direct your web browser to https://build.particle.io/build/new
-
Here is the code for Project 3:
    #define BUTTON_PIN D0

    String lightMode;

    void setup() {
      RGB.control(true);
      RGB.color(0, 0, 0);

      pinMode(BUTTON_PIN, INPUT);
      Particle.subscribe("team_name", blinkLight); // replace team_name with your team's name (no spaces)
    }

    void loop() {
      int buttonState = digitalRead(BUTTON_PIN);

      if (buttonState == HIGH) {
        Particle.publish("team_name", "green"); // replace with your team's name and choose a color for your button
        delay(2000);
      }
    }

    void blinkLight(const char *event, const char *data) {
      lightMode = data;

      if (lightMode == "red") {
        RGB.color(255, 0, 0);
        delay(1000);
        turnOffLight();
      } else if (lightMode == "green") {
        RGB.color(0, 255, 0);
        delay(1000);
        turnOffLight();
      } else if (lightMode == "blue") {
        RGB.color(0, 0, 255);
        delay(1000);
        turnOffLight();
      } else if (lightMode == "rainbow") {
        showTheRainbow();
        turnOffLight();
      }
    }

    void turnOffLight() {
      RGB.color(0, 0, 0);
    }

    void showTheRainbow() {
      // number of milliseconds to delay between pixel change
      // lower this number to speed up the rainbow
      int rainbowDelay = 10;

      // start with Red on, and make Green grow brighter
      for (int i = 0; i < 255; i += 10) {
        RGB.color(255, i, 0);
        delay(rainbowDelay);
      }
      // Green is now on, make Red shrink
      for (int i = 0; i < 255; i += 10) {
        RGB.color(255 - i, 255, 0);
        delay(rainbowDelay);
      }
      // Green is now on, make Blue grow
      for (int i = 0; i < 255; i += 10) {
        RGB.color(0, 255, i);
        delay(rainbowDelay);
      }
      // Blue is now on, make Green shrink
      for (int i = 0; i < 255; i += 10) {
        RGB.color(0, 255 - i, 255);
        delay(rainbowDelay);
      }
      // Blue is now on, make Red grow
      for (int i = 0; i < 255; i += 10) {
        RGB.color(i, 0, 255);
        delay(rainbowDelay);
      }
      // Red is now on, make Blue shrink
      for (int i = 0; i < 255; i += 10) {
        RGB.color(255, 0, 255 - i);
        delay(rainbowDelay);
      }
    }
Note that you need to insert a unique name for your team in two places, once in void setup() and once in void loop(). The name must match across members of your team to enable inter-device communication. It should be enclosed in quotes wit no spaces.
Note as well that you should give each device on your team a unique color (“red”, “green”, “blue”, or “rainbow”) so that you can see the effect of an individual Photon Redboard on the group.
-
Click on the Verify ✔ icon to check your code for errors. Address any errors that the IDE may identify.
-
Click on the Flash ⚡ icon to “flash” your code to your Photon Redboard.
Once the code is flashed to each team member’s Photon Redboard, press the button on each one in turn and see how the Particle.subscribe() messaging structure works.
Watch your Console and note that it registers Particle.publish() events from your Photon Redboard but does NOT register subscribed events. This is constitutive of the nature of the pub/sub messaging framework.