Particle makes available a REST API that allows you to access variables and functions that you may choose to expose on your Photon/Photon Redboard. In this tutorial we’ll cover the basic steps for setting up a simple webpage and accessing a target Photon via its deviceID and access_token. We will illustrate both how to access and display a variable from a sensor on a Photon as well as how to execute a function on that Photon through a webpage.
In this example, the variable value will represent the position of a potentiometer and the function will turn the onboard LED (which is hardwired to pin D7 on the Photon Redboard)
For full documentation of the Particle Cloud API, see https://docs.particle.io/reference/api/
Part I - Photon Redboard Wiring
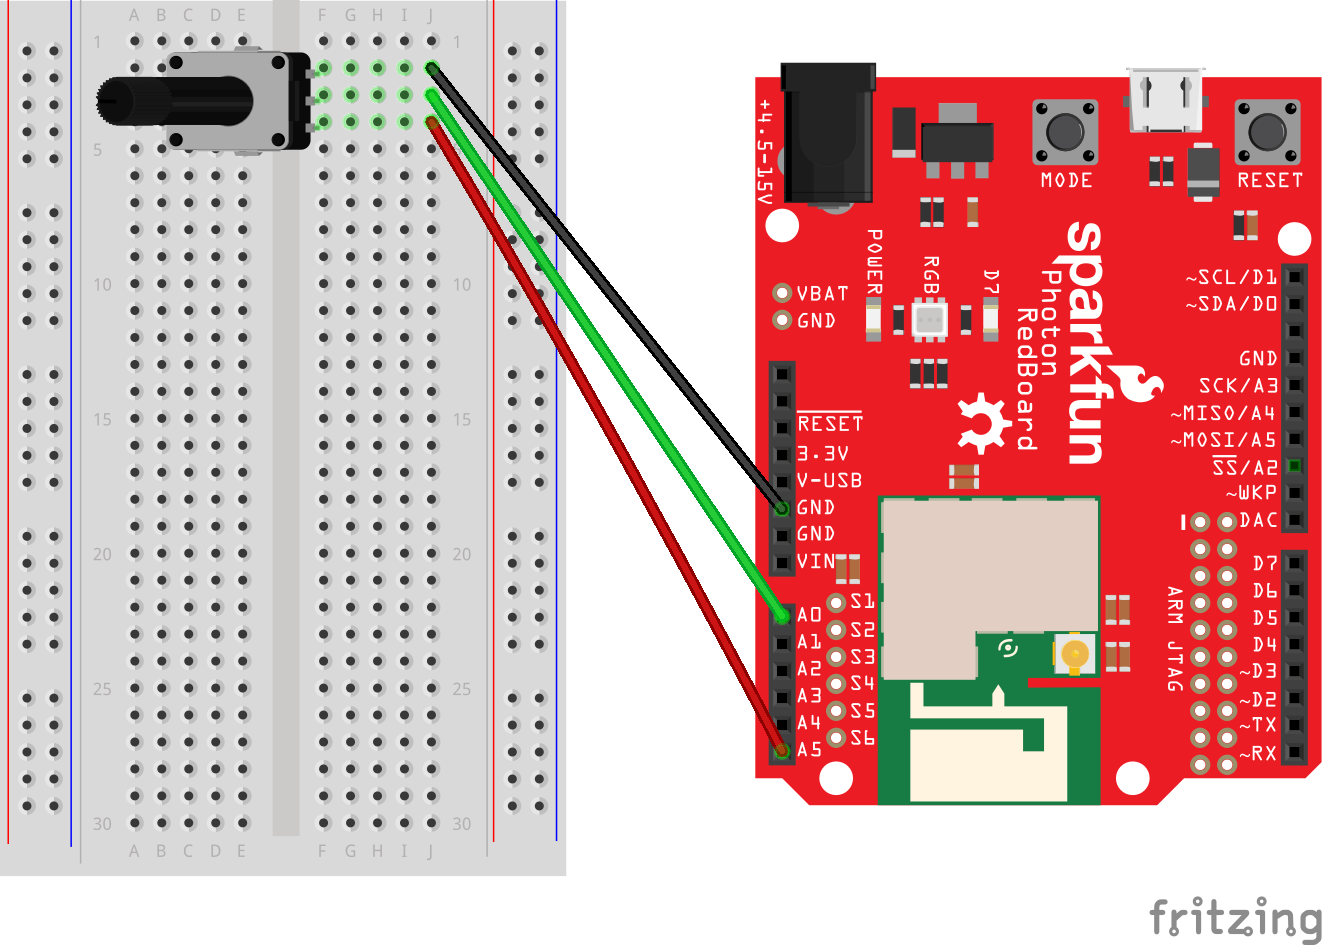
This project requires that you wire up a potentiometer – one terminal to GND on the Photon; the middle terminal to pin A0; and the third terminal to pin A5, which will be powered at a constant 3.3v with a digitalWrite() function in void setup() (see Part II below).
This project will also make use of the onboard LED attached to pin D7, which does not require any additional wiring.
Part II - Photon Code
The two main Particle functions that you need to understand for this exercise are:
-
Particle.variable()- Exposes a variable on your Photon through the Particle Cloud so that it can be accessed with a GET http method. -
Particle.function- Exposes a function on your Photon through the Particle Cloud so that it can be called/executed with a POST http method.
We’ll begin by writing the Photon code for reading a potentiometer attached to pin A0 and for toggling on/off the onboard LED (pin D7).
Basic Code for Potentiometer & On-Board LED Toggle
Copy the following code to a new project in the online Particle IDE.
//pin declarations
int led = D7; // onboard LED
int potentiometer = A0; // pin to read pot value (pot middle terminal)
int power = A5; // will provide constant 3.3v to potentiometer + terminal

// variable to store potentiometer value
int analogvalue;

void setup() {
    // pin IO declarations
    pinMode(led, OUTPUT);
    pinMode(potentiometer, INPUT);
    pinMode(power, OUTPUT);

    // provide power to the potentiometer
    digitalWrite(power,HIGH);
}

void loop() {

    // check to see what the value of the potentiometer is
    // and store it in the int variable analogvalue
    analogvalue = analogRead(potentiometer);

}

// create a function that will take a string "on" or "off"
// and toggle D7 LED based
// ledToggle("on"); turns on the D7 LED
// ledToggle("off"); turns off the D7 LED
int ledToggle(String command) {

    if (command=="on") {
        digitalWrite(led,HIGH);
        return 1;
    }
    else if (command=="off") {
        digitalWrite(led,LOW);
        return 0;
    }
    else {
        return -1;
    }

}
You’ll note that the code above declares the ledToggle() function but doesn’t actually execute it anywhere in the Photon code. While we are going to call this function remotely using an http POST method, nothing precludes you from using this function elsewhere in the script, such as when the analogvalue reaches a certain threshold.
In order to “expose” the value of analogvalue and the function ledToggle() to http methods, you will need to add the following lines to the void setup() section of your code, below digitalWrite(power,HIGH);
    // Exposes the value of a variable on the Photon to an http GET method
    // syntax:  Particle.variable("PublicName", &local_varName, DATATYPE);
    // where datatypes can be INT, DOUBLE, or STRING
    Particle.variable("potValue", &analogvalue, INT);

    // Exposes a function on the Photon to an http POST method
    // syntax: Particle.function("PublicName", functionName);
    Particle.function("led",ledToggle);
    // ^^ This is saying that when we ask the cloud for the function "led",
    // it will employ the function ledToggle() from this app.
The full .ino file is available here: photon-RESTapi.ino
Verify and flash this code to the Photon you wired up in Part I above.
If you think the code has been flashed successfully to your Photon, continue to Part III.
Part III - Test using Particle CLI
You can make certain that your code is functioning properly via the Particle CLI in Terminal.
- Launch Terminal and enter the following:
particle listThis command should query Particle.io for a list of all of your associated Photons. For example:
myPhoton1 [2121550447343232363230] (Photon) is offline

myPhoton2 [27333ff0947343432313031] (Photon) is offline

Salamander [3e3333001247353136383631] (Photon) is online
    Variables:
        potValue (int32)
    Functions:
        int led(String args)
Note that the last Photon, “Salamander”, is indicating that it has available for access a 32-bit signed integer variable called “potValue” and a function called “led” that will take string arguments.
- Let’s use Particle CLI to access the current value of the potentiometer. The command to use is
particle get[documentation].
Enter the following command in Terminal, replacing <deviceID> with your Photon’s identifier:
particle get <deviceID> potValue
You’ll want to use the following syntax: particle get <deviceID> <variableName> [using the <deviceName> instead of the deviceID also works]
Your request should return a value between 0 and approx. 4096.
Adjust the potentiometer and use particle get again to get the new value.
-
Now we’ll use Particle CLI to access the exposed function using
particle call[documentation].Enter the following command in Terminal, replacing
deviceIDwith your Photon’s identifier:particle call <deviceID> led "on"The Terminal should return a “1” and the onboard LED should glow blue.
To turn it off again with this Terminal command, replacing
<deviceID>with your Photon’s identifier:particle call <deviceID> led "off"The Terminal should return a “0” and the onboard LED should turn off.
If you mistype the “on” or the “off”, note that the command returns -1, indicating an error.
Now that you’ve verified your Photon’s exposed variable(s) and function(s) are working using Particle CLI, proceed to Part IV to set up a simple webpage to access the same data / functions.
Part IV - HTML
In this section, we will outline the HTML and Javascript code necessary for accessing variable values and executing functions on your Photon through a webpage.
First, however, you need to get an access_token from Particle so that you can make authorized GET/POST requests to https://api.particle.io.
Prerequisite: Access Token
In order to access your Photon’s variables and/or functions through a webpage, you first need to procure an access_token specifically for your Particle account.
You can access your accounts available access_tokens as well as create new ones via Particle CLI and your Terminal.
- Launch Terminal and enter:
particle token listYou will be prompted for your password.
-
The output should provide a long list of access tokens, including those that are used by your user account to access build.particle.io as well as Particle CLI.
__PASSWORD_ONLY__
     Token:      3921f0948b7c40140c922641cefc4623e6049c3d
     Expires at: 2017-10-07T18:36:12.542Z
You can revoke / delete an existing access_token by entering
particle token revoke <tokenID>in the Terminal. - Create a new access token by entering the following at the prompt:
particle token newYou will be prompted for your Particle.io password.
The Terminal will then create and return an access_token.
- Finally, copy that access_token in a manner that you can retrieve it for use in the HTML and CSS section below. You’ll also want to note the deviceID of the Photon you are targeting.
HTML & Javascript
In this section, we’ll outline the HTML and Javascript necessary to access your Photon using http GET and POST methods.
-
Create a new HTML file (with extension
.html). - Copy and paste the following, which represents the basic skeleton of an HTML5 webpage:
<!DOCTYPE html>
<html>
    <head>
        <meta charset="UTF-8">
        <title>Photon REST API Tutorial</title>

    </head>
    <body>
        <h1>Photon REST API Tutorial</h1>

        <h2>Toggle On-Board LED (D7)</h2>
        <button id="onButton">ON</button>
        <button id="offButton">OFF</button>

        <hr />

        <h2>Potentiometer Value</h2>
        <button id="getPotentiometer">Get Potentiometer Value</button>
        <p>Potentiometer Value: <span id="amount">No Reading Yet</span></p>

    </body>
</html>
The page has two sections, one for toggling the on-board LED, and a second for calling the potentiometer value.
Be sure to save your HTML file!
- Next, let’s add the jQuery library, which will simplify the Javascript necessary to make GET and POST requests and to parse JSON. Add the following to the HTML markup, just above the closing
</head>tag:<script src="https://code.jquery.com/jquery-3.2.1.min.js" integrity="sha256-hwg4gsxgFZhOsEEamdOYGBf13FyQuiTwlAQgxVSNgt4=" crossorigin="anonymous"> </script>jQuery CDN code available at https://code.jquery.com/
Be sure to save your HTML file!
-
Now let’s write the Javascript (using jQuery) for accessing our Photon. Just above the closing
</body>tag, add the following:<script type="text/javascript"> </script>We’ll be working inside this
<script> </script>tag.First, let’s create some variables to hold our
<deviceID>andaccess_token:var deviceID = "<yourDeviceIDhere>"; var accessToken = "<yourAccessTokenHere>";NOTE: Because your deviceID and access_token will be visible in your HTML code, access to your Photon is relatively insecure.
Next, let’s set two variables: one for the function we want to call (
led) and a second for the value we want to access on the Photon (potValue):var func2call = "led"; var var2get = "potValue"; -
Now we can write the function to attach to the “on” button that will make an http POST request to the Particle API:
function turnLEDOn() {
    var requestURL = "https://api.particle.io/v1/devices/" + deviceID + "/" + func2call + "/";
    $.post( requestURL, { params: "on", access_token: accessToken });
}
And then scroll up to the code for the button with
id="onButton"and attach an onClick function to it -onclick="turnLEDOn();":<button id="onButton" onclick="turnLEDOn();">ON</button>Save your HTML page. Test it by opening it in your browser of choice and try clicking on the ON button. The blue on-board LED on your Photon should turn on and glow a steady blue.
-
Now return to your HTML markup and we can write the function to turn off the LED using an http POST request:
function turnLEDOff() {
    var requestURL = "https://api.particle.io/v1/devices/" + deviceID + "/" + func2call + "/";
    $.post( requestURL, { params: "off", access_token: accessToken });
}
Scroll up to the code for the button with
id="offButton"and attach this onClick function to it -onclick="turnLEDOff();":<button id="offButton" onclick="turnLEDOff();">OFF</button>Save your HTML file and test it. You should be able to toggle the on-board LED using the ON and OFF buttons.
- Finally, we’ll create a function for accessing the value of the Photon’s potentiometer using an http GET method. Add this function to your
<script>below the two LED functions:function getValue() { var requestURL = "https://api.particle.io/v1/devices/" +deviceID + "/" + var2get + "/?access_token=" + accessToken; $.getJSON(requestURL, function(json) { $("#amount").text(json.result); }); }The code above will make an http GET request to the Particle API which will return a JSON object with a result containing the value of the potentiometer. The value is then written into
<span id="amount"></span>, replacing its contents.Scroll up to the code for the button with
id="getPotentiometer"and attach an onclick function to it to call thegetValue()function:<button id="getPotentiometer" onclick="getValue();">Get Potentiometer Value</button>Save your HTML file and open it in your browser to test this functionality.
The full .html file is available here: photon-RESTapi.html
Other Form Inputs
In addition to buttons, you can use other form inputs for triggering http GET and POST methods.
Select
Instead of having two separate buttons and two separate functions for toggling the on-board LED, you could instead use a <select> form element:
<select id="toggle" onchange="toggleLED(this.value);">
    <option value="off">OFF</option>
    <option value="on">ON</option>
</select>
And then the javascript:
function toggleLED(toggle) {
    var requestURL = "https://api.particle.io/v1/devices/" + deviceID + "/" + func2call + "/";
    $.post( requestURL, { params: toggle, access_token: accessToken });
}
HTML5 Color Picker
In HTML5, setting up a color picker is easy:
<input type="color">
You can use the onchange handler to trigger a javascript function when a